How to Safely Roll Out New Features
Estimated Reading Time: 7 minutes ☕☕
Rolling out new features in your product can really be a pain.
As a company that is growing fast and consistently putting out new functionality, we know this very well.
You might have great tests and robust CI/CD workflows in place, but there's always the chance that something will go wrong, or that your users may not appreciate the change.
To make this process less painful and safer, you can use feature flags.
Feature flags allow you to safely deploy and roll back new features. It means you can deploy features and then slowly roll them out to your users. If something has gone wrong, you can roll back new features without having to re-deploy your application.
This tutorial will walk you through creating and using a feature flag with PostHog and answer some of the questions you may have when using them.
...
Prefer to watch a video? Check out the Feature Flags section of our demo video for a shorter overview of this functionality.
Pre-Requisites
To follow this tutorial along, you need to:
- Have deployed PostHog
- Have added the PostHog snippet to your website. Alternatively, you can also be using our API or Python integration, which have support for feature flags. However, please note that the examples in this tutorial will be written in JavaScript.
Playground (Beta)
As a supporting resource for this tutorial, we have created a playground where you can test out the functionality explained here.
It is recommended that you go through the tutorial first to understand the concepts better before seeing the functionality in action.
Please note that the playground is a Beta feature, and we would appreciate feedback on GitHub.
Determining a Use Case
Before you create a feature flag, you should have an idea in mind of a feature that you want to only roll out to a subset of your users. If you'd like some inspiration to determine a good use case, you can refer to the 'Putting Your Flag to Use' section of this tutorial for ideas.
It can also be useful to create your feature flags before working on the functionality, so that you can build the feature with the flag in mind, saving you the time and effort to make sure the feature built is completely encapsulated by the flag.
Creating Feature Flags
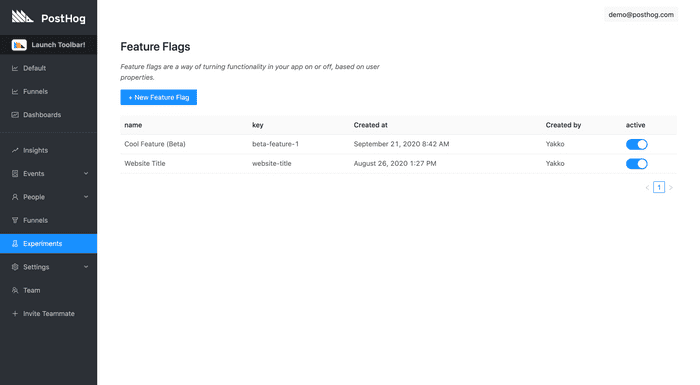
Step 1: Navigate to 'Experiments'
To find the feature flags page, click on 'Experiments' on the left sidebar in PostHog.
Step 2: Creating a New Flag
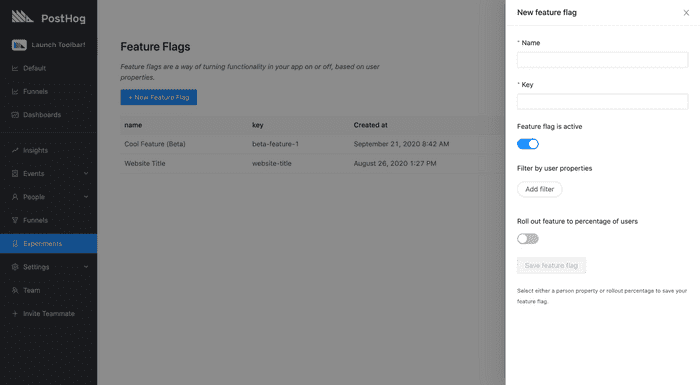
While on the 'Experiments' page, click on the blue '+ New Feature Flag' button. This will open up a menu on the right side of the page, like so:
Step 3: Configuring Your Flag
With the menu open, you will see there are a few options you can configure for your flag. Here's the purpose of each one:
Name
A memorable name for you and your team to refer to the flag.
Key
Used to refer to your flag in your codebase. While the flag name does not affect the implementation, the key does. When adding the feature flag to your code, you will always use the key, never the name. In addition, changing a flag key may affect the persistence of your flag.
Feature flag is active
This toggle is an important part of feature flags. It means you can turn feature flags on only when you're ready to do so, or off if something goes wrong. It can be used as a "kill switch" for features.
Filter by user properties
Feature flags can be rolled out based on a wide variety of filters. These are:
- User properties
- Cohorts
- Percentage of users
- A combination of the above
Under 'Filter by user properties', you can specify various properties and/or cohorts that a user must match in order to have the flag active. This works on an AND basis, meaning that a user must match all of the specified filters.
These filters are very powerful, allowing you to both offer a tailored UX to your users, as well as gather powerful insights into how different groups of user might behave. For example, you could define logic such as:
- Show technical content to users who have the
has_read_docsproperty equal totrue - Roll out the new design only to users in the 'Dark Mode Users' cohort
- Show advanced options by default to users in the 'Organization Admins' cohort who have
@bigcompany.comin theiremailproperty
Roll out to a percentage of users
This option can be used either by itself or in combination with the property/cohort filters.
When used by itself, it means that X% of your users will have the flag on and the other (100-X)% will have it off.
This mechanism is random but deterministic. What this means is that it is a weighted random selection that establishes which users will have the flag on or off, but a given flag will persist for a every user (if nothing else changes). This ensures that users don't have a different experience each time they visit your app.
When used in conjunction with property filters, PostHog will first check if the user matches all the filters, and then apply the rollout percentage. This means that X% of the users who match the filters will see the flag, rather than X% of overall users.
Step 4: Saving Your Flag
Just click 'Save feature flag' and that's it! Your flag will now be active. Clicking on it will also allow you to edit it as you wish.
Implementing the Feature Flag
When you create a feature flag, PostHog displays an example snippet that you can plug into your codebase. It looks something like this:
if (posthog.isFeatureEnabled('new-beta-feature')) {
    // do something
}
This snippet refers to our JavaScript Integration, which is also what we will be using for this tutorial. However, you can also use feature flags via our API as well as other libraries, such as our Python Integration (we're working to add this functionality to as many of our libraries as possible).
With that snippet, you can then do whatever you wish inside of it. You might change the CSS of a button, hide an entire section, or move things around. A simple example implementation would be:
// Header text is blue by default
// If flag is on, make the text red
if (posthog.isFeatureEnabled('red-header-text')) {
    document.getElementById('header-text').style['color'] = 'red'
}
While this is a trivial example, you can have as much logic as you want being powered by the feature flag. You can also combine flags with OR & AND operations to create more complex logic.
Advanced Controls
Ensuring flags are loaded before usage
Every time a user loads a page we send a request in the background to an endpoint to get the feature flags that apply to that user. We store those flags as a cookie.
This means that for most page views the feature flags will be available immediately, except for the very first time a user visits your site.
To combat that, there's a callback you can use to wait for the flags to come in:
posthog.onFeatureFlags(function() {
    // feature flags are guaranteed to be available at this point
    if (posthog.isFeatureEnabled('new-beta-feature')) {
        // do something
    }
})
Forcing feature flags to update
In our JS Integration, the reason we store flags as a cookie is to reduce the load on the server and improve the performance of your app, as it doesn't need to always make an HTTP request, it can simply refer to data stored locally in the browser.
While this makes your app faster, it means that if your user does something mid-session which causes the flag to turn on for them, this will not be immediately updated. As such, if you expect your app to have scenarios like this and you want flags to update mid-session, you can reload them yourself, by using the reloadFeatureFlags function.
posthog.reloadFeatureFlags()Calling this function will force PostHog to hit the endpoint for the updated information, and allows you ensure changes are reflected mid-session.
Putting Your Flag to Use
Feature flags are a very powerful piece of functionality that can be used in a wide variety of ways. How you use them will depend on your particular painpoints and internal best practices.
Here are some suggestions of use cases that could fit nicely with feature flags:
Exploring the impact of a feature on business metrics
Perhaps the most useful way to utilize feature flags is to answer relevant questions about your product, especially regarding how you can make it better.
You might be interested in improving conversion, retention, or just making sure you have a good user experience.
To do this, you can do A/B testing with feature flags.
In simple terms, A/B testing is a method for determining how to provide the best user experience or meet other product goals by testing how different features perform.
This could be used to answer questions such as "Do users click a button more often if it is blue or red?" or more complex questions like "How does our conversion rate for free trial users becoming paid users change if we double the number of CTAs on the page?".
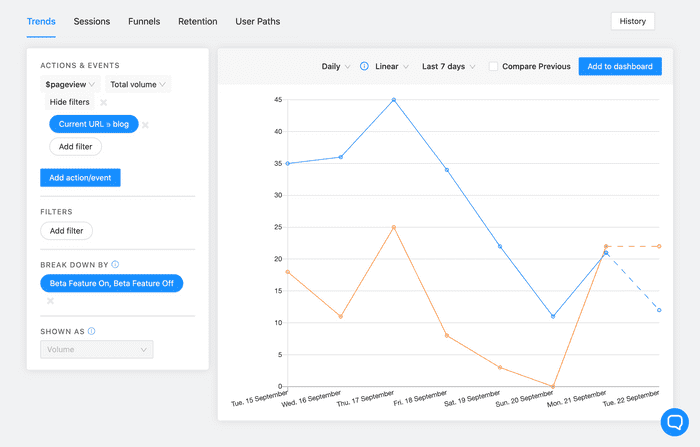
A great way to do this is by using Cohorts. If you filter your flags by cohort, you can then easily see the differences in behavior across different user groups.
Here's an example view of Trends in PostHog filtering pageview events that contain the term "blog" in the URL, showing a breakdown between Cohort A (Beta Feature On) and Cohort B (Beta Feature Off):
Starting with a few users first
There are many occasions when you might want to roll out a feature to your users slowly. Maybe you only want to enable it for Beta users, or you simply want to give users a transtion period.
Whatever the case may be, feature flags let you easily roll out features in an incremental way, increasing the portion of users that have the feature as fast or slow as you wish.
Getting a huge feature into production
If you have to ship a big piece of functionality, chances are that you'll be doing it across multiple PRs.
As such, rather than attempt to coordinate a merge spree to ensure everything is live at once, you can create a feature flag that wraps all the new logic in all the pull requests. Then, once everything is merged and ready to go, you can simply flip the switch to release it.
Better yet, you can then release it slowly to make sure nothing breaks, and, if it does, you can easily turn it off with one click.
And this brings us to the next example.
Rollback with peace of mind
You don't need feature flags per se to implement kill switches, but having the ability to immediately turn a flag off is a nice add-on to the functionality.
Perhaps your goal all along was to do A/B testing for your UX, but, when something breaks, you can always roll it back safely with minor consequences (if implemented correctly).


